
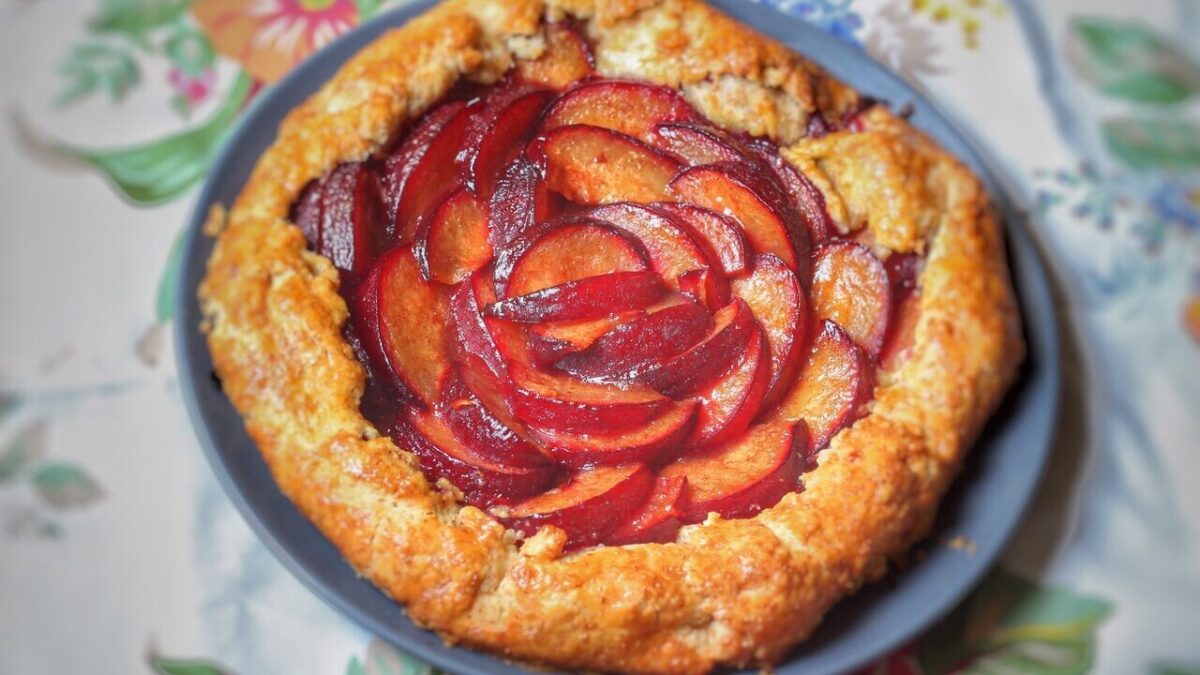
It’s early spring but I’m already jumping ahead to the great summer fruit that’s soon to come. Plums are some of the first to appear – purple, red and yellow – and although they are delightful to eat on their own I especially love them in a plum tart. And we're lucky to have our own plum trees!

Here's one of my recipes from last spring that I’m just finally getting around to writing up.
There are a few things I love about this plum tart and of course the first is its sweet and tart flavor! I also love it because it’s a free-form tart so super easy to make for just about anyone including my five-year-old grandson who gave me a hand with this last spring.
When you make a plum tart, or a fruit pie without a top crust, one important thing for the aesthetics of the tart is to spread some jam on top of the tart just as it comes out of the oven. This will give the tart a beautiful glossy look. Don’t worry about what fruit jam you use: just use a jam that is similar to the tart you’re making. So in other words I wouldn’t use strawberry jam for a plum tart, but I would use plum, peach or apricot.
Plum Tart
Ingredients:
For the crust:
300 g all-purpose or “00” flour
150 g butter
30 g granulated sugar
1 teaspoon salt
6 tablespoons ice cold water
For the filling:
8 to 10 medium, firm plums
¼ cup granulated sugar
3 tablespoons cornstarch
½ teaspoon salt
1 teaspoon cinnamon
To glaze the crust:
One beaten egg
Cinnamon sugar for sprinkling, as needed
To spread on the fruit filling once the tart is baked:
¼ cup plum or peach jam
Procedure:
Preheat the oven to 425°F.
For the crust:
Cut the cold butter into half inch cubes
If you prepare the dough with a food processor:
Place the flour, sugar and salt in the food processor.
Pulse until fully blended.
Add the butter and pulse until the mixture is granular, or forms small peas.
Very gradually add the ice cold water, pulsing on and off, until the dough forms a ball.
Note: You may not need to use all the water.
Don’t over-process the dough as this will take away from its light and flaky texture once baked.
If you prepare the dough by hand:
Whisk the flour, sugar and salt together in a very large mixing bowl.
Add the cubed butter and using a knife or a pastry cutter cut the butter into the flour mixture until it forms small peas and is granular.
Sprinkle the ice-water into the flour mixture and cut it in with a knife or pastry cutter.
Only add just enough water so that the dough begins to stick together and form a ball.
For the filling:
Slice the plums into ¼ inch (½ centimeter) wedges and place them in a mixing bowl.

Whisk the sugar, cornstarch, salt and cinnamon together until fully blended.
Add the plum wedges and toss until fully covered.
Assembling and baking the plum tart:
On a lightly floured surface roll the dough into a 14 inch round.
Gently place the dough onto a baking sheet lined with parchment paper.
Use a thin, flexible, metal spatula to assist in lifting up the dough round and placing it onto the baking sheet.
I find that using a very thin plastic cutting board helps to lift the dough if you gently slip it under the dough.
Basically the thin plastic cutting board serves as a giant spatula.
This way the dough won’t tear as you lift it up and place it onto the baking sheet.
Arrange the plum wedges into the center of the dough and fan out the plum wedges in circular fashion to form an attractive design.
Leave a 2 inch border of dough.
Once you have finished arranging the plums on the center of the dough gently lift up the dough border and fold it on top of the fruit.
Drizzle any remaining juices left in the bowl on top of the fruit.
Use a small silicone baster to spread the beaten egg atop the crust border.
Sprinkle the top of the tart with cinnamon sugar, as desired.
Bake at 425°F for 15 minutes, then lower the temperature to 350°F and bake for an additional 20 to 30 minutes.
Once the pie crust is golden and the plums are just tender the tart is done.
When the tart is just about done heat the jam in a small saucepan or in a microwave until it becomes quite liquid.
Remove the tart from the oven.
Use a silicone baster to gently spread the jam on top of the plums.
This will give the fruit an attractive shiny glaze.
Cool the tart before serving.
I like to serve plum tart a little warm with a scoop of ice cream or drizzled with fresh cream, or just on its own.
Have a question or want to leave your own tips and recommendations? Click here to leave a comment:
3 CommentsPlease note that the below printable recipe can be viewed and printed in either metric or U.S. conventional measurements; just click on your preference within the recipe.
Equipment
- baking sheet
- oven paper
- mixing bowls
- whisk
- pastry brush, silicone
- plastic cutting board, extra thin
- pastry cutter/blender
- food processor, optional
Ingredients
For the crust:
- 300 g all-purpose or “00” flour
- 150 g butter
- 30 g granulated sugar
- 1 teaspoon salt
- 6 tablespoons ice cold water
For the filling:
- 8 to 10 medium firm plums
- ¼ cup granulated sugar
- 3 tablespoons cornstarch
- ½ teaspoon salt
- 1 teaspoon cinnamon
To glaze the crust:
- One beaten egg
- Cinnamon sugar for sprinkling as needed
To spread on the fruit filling once the tart is baked:
- ¼ cup plum or peach jam
Instructions
- Preheat the oven to 425°F.
For the crust:
- Cut the butter into half inch cubes
If you prepare the dough with a food processor:
- Place the flour, sugar, salt in the food processor.
- Pulse until fully blended.
- Add the butter and pulse until the mixture is granular, or forms small peas.
- Very gradually add the ice cold water, pulsing on and off, until the dough forms a ball.
- Note: You may not need to use all the water.
- Don’t over-process the dough as this will take away from its light and flaky texture once baked.
If you prepare the dough by hand:
- Whisk the flour, sugar and salt together in a very large mixing bowl.
- Add the cubed butter and using a knife or a pastry cutter cut the butter into the flour mixture until it forms small peas and is granular.
- Sprinkle the ice-water into the flour mixture and cut it in with a knife or pastry cutter.
- Only add just enough water so that the dough begins to stick together and form a ball.
For the filling:
- Slice the plums into ¼ inch (½ centimeter) wedges and place them in the mixing bowl.
- Whisk the sugar, cornstarch, salt and cinnamon together until fully blended.
- Add the plum wedges and toss until fully covered.
Assembling and baking the plum tart:
- On a lightly floured surface roll the dough into a 14 inch round.
- Gently place the dough onto a baking sheet lined with oven paper.
- Use a thin, flexible, metal spatula to assist in lifting up the dough round and placing it onto the baking sheet.
- I find that using a very thin plastic cutting board helps to lift the dough if you gently slip it under the dough.
- Basically the thin plastic cutting board serves as a giant spatula.
- This way The dough won’t tear as you lift it up and place it onto the baking sheet.
- Arrange the Plum wedges into the Center of the dough fanning out the plum wedges in circular fashion to form an attractive design.
- Leave a 2 inch border of dough.
- Once you have finished arranging the plums on the center of the dough gently lift up the dough border and fold it on top of the fruit.
- Drizzle any remaining juices left in the bowl on top of the fruit.
- Use a small silicone baster to spread the beaten egg atop the crust border.
- Sprinkle the top of the tart with cinnamon sugar, as desired.
- Bake at 425°F for 15 minutes, then lower the temperature to 350°F and bake for an additional 20 to 30 minutes.
- Once the pie crust is golden and the plums are just tender the tart is done.
- When the tart is just about done heat the plum or peach jam in a small saucepan or in a microwave until it becomes quite liquid.
- Remove the tart from the oven.
- Use a silicone baster to gently spread the jam on top of the plums.
- This will give the fruit an attractive shiny glaze.
- Cool the tart before serving.
- I like to serve plum tart a little warm with a scoop of ice cream or drizzled with fresh cream, or just on its own.
Nutrition
Another tasty dessert recipe is Lemon Ricotta Pancakes with Fresh Berries that's great for breakfast or anytime. And if you like donuts and donut holes you'll love these Italian Castagnole that are typical at Carnevale but great any time of the year.
PIN THIS ON PINTEREST:

PIN THIS ON PINTEREST:

PIN THIS ON PINTEREST:

I make a small commission on purchases made through links on my website. Prices are identical, but purchasing through my links helps support my work to bring you great recipes, culinary and travel information.


Delicious and well written recipe! Thank you!
Thank you, Angela! Very pleased you enjoyed this recipe! It's one of my favorites.
Came out great! So pretty and not too difficult.